
Table of Contents
How do I install Zoiper 5 on Windows?
Customers should read the Restrictions section of the Softphones and Customer Supplied Desk Phones Wiki before installing or configuring a softphone. Customers sharing the same extension on more than one device or connecting a automated dialing device, such as Vicidial, are subject to account restrictions or termination without notice or refund. Customers who have any questions or concerns about these policies and procedures should Submit A Ticket and a member of our Sales Department will be happy to assist you.
Helix Telecom offers free documentation support for Zoiper v5 on Windows. Customers must sign-in to the Support Portal, locate the section labeled Softphone and Customer Supplied Hardware Configuration Information and have this information ready during the installation. Customers may also wish to install a compatible microphone and headset prior to installation. Helix Telecom does not provide any hardware support for configuring or troubleshooting headset, microphone or computer issues.
Zoiper is free for customers who would like to make/receive calls. Customers who need more advanced functionality like call transfer, conference calling, paging, etc.. will be prompted to upgrade the Zoiper free license to a professional license. Helix Telecom does not sell or profit from Zoiper or license upgrades.
Start the Installation
- Visit https://zoiper.com.
- Click DOWNLOAD from the top menu.
- Click the DOWNLOAD button next to Windows.
- Click the DOWNLOAD button under FREE. Customers who would like to purchase a license should do so after installing and testing the free version.
- Run the downloaded Zoiper installation file.
- Click YES if prompted.
- The Zoiper Setup Wizard should appear on your screen.
- Click NEXT.
- Click I ACCEPT THE AGREEMENT radio button.
- Click NEXT.
- Click NEXT.
- Click NEXT.
- Click NEXT.
- Click NEXT.
- Click NEXT.
- Click NEXT.
- Zoiper should complete the installation.
- !! STOP !! DO NOT CLICK FINISH !!
Helix Telecom provides both the softphone username, password and proxy as well as downloadable Zoiper configuration files. Choose between Manual Configuration or Automated Configuration options below before proceeding to the next step.
Manually Configure with Username, Password and Proxy Information
- Verify LAUNCH ZOIPER5 is checked.
- Click FINISH.
- Click ALLOW ACCESS if prompted.
- Zoiper should launch automatically.
- Click CONTINUE AS A FREE USER when prompted to activate a license.
You will be prompted to enter your Helix Telecom account credentials into 2 fields. The first field is the username and proxy. The second field is labeled “Password”.
- In the first field enter your username as extension@proxy. For example.. 1000@proxy999.phone123.me.
- In the second field enter the password for the extension you are configuring. The password is case sensitive. If copying/pasting the password please be sure to avoid copying/pasting any spaces before or after the password. If the wrong password is entered your account will be locked for 24 hours.
- Click LOGIN.
- You will be prompted to enter your hostname. This field should be completed for you automatically. If the field is blank enter your proxy again. The proxy should be in the format proxy999.phone123.me.
- You may be prompted to enter Authentication and Outbound Proxy. Click SKIP.
- Zoiper will attempt to configure your softphone. The option SIP UDP should turn green and should be selected automatically. Click NEXT to continue. You do not need to wait for Zoiper to complete the configuration.
- You will be prompted to configure your headset. This step is not usually necessary. Click SKIP.
- The Zoiper softphone should appear on your screen. If the configuration was successful you should see a GREEN CHECKBOX on the bottom left hand corner of the window.
Automated Configuration with Zoiper Config.xml File
- Uncheck LAUNCH ZOIPER5 box.
- Click FINISH.
- It is important the Zoiper client is closed before proceeding. If you did not uncheck the LAUNCH ZOIPER5 box then you must close Zoiper before proceeding or use the Manual Configuration instructions above.
- Login to the Support Portal, locate the Softphone and Customer Supplied Hardware Configuration Information section and click the DOWNLOAD button for the extension number you would like to use with this computer. Do not rename the Config.xml file.
- Click START then click RUN OR Hold the CTRL key and press the R key.
- Enter
%APPDATA%into the OPEN field. - Click OK.
- The file explorer should appear on your screen containing the Zoiper5 configuration folder.
- Open the Zoiper5 folder.
- Copy and paste the Config.xml file downloaded from the Support Portal into the Zoiper5 folder. You should be prompted to overwrite the existing Config.xml file already created by Zoiper during the installation.
- CLose the File Explorer.
- Launch Zoiper either via the Start Menu or the Zoiper5 icon on the desktop.
- You will be prompted to purchase a license. Click CONTINUE AS A FREE USER.
- You will be prompted to configure your Speaker and Microphone. Click SKIP at this time.
- The Zoiper softphone should appear on your screen. If the configuration was successful you should see a GREEN CHECKBOX on the bottom left hand corner of the window.
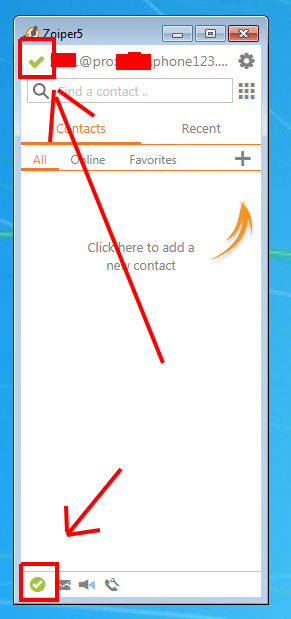
Check for Successful Installation
You should see a screen similar to this one showing a green checkbox next to the extension. You should also see a green checkbox at the bottom of the page.
User Guide, Helpful Information
If you need any additional assistance please download the Zoiper 5 User Guide: user_guide_zoiper_5_v.1.0.6.pdf
The recommended sections to read are:
- Pages 41-42 for information about configuring your microphone, speaker and ringing device.
- Page 45 for information about configuring look and feel of the Zoiper soft-phone.
If you have any additional questions please contact the Helix Telecom Sales Department for assistance.