
Table of Contents
How can I tell if Do Not Disturb is enabled?
It is not possible to tell if Do Not Disturb is enabled on your phone unless you pressed the Do Not Disturb button on your phone. If you enabled Do Not Disturb via the website or you dialed a Toggle Code then the Do Not Disturb message will not appear on your phone's display.
What is Do Not Disturb?
Do Not Disturb allows a customer to disable incoming calls on a specific phone. There are multiple ways to enable Do Not Disturb. You must use the same method to disable Do Not Disturb as used to enable it. Below are the most common methods for disabling Do Not Disturb.
Please note if Do Not Disturb is enabled on a customer's device then Helix Telecom staff will be unable to disable Do Not Disturb remotely. Customers must follow all instructions below to disable Do Not Disturb manually.
Disable Via Mute Button
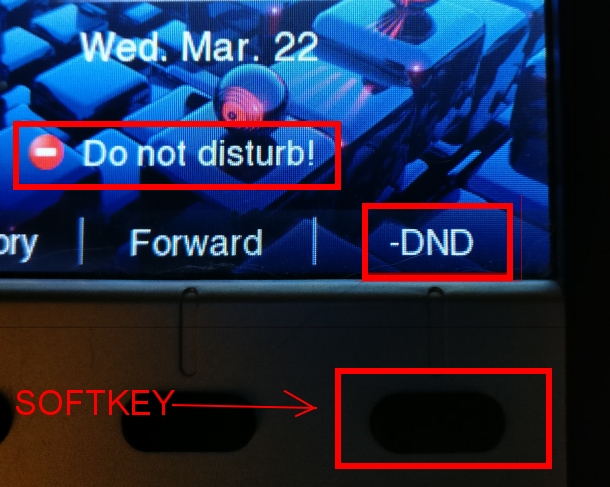
If you see a button on your phone labeled -DND then Do Not Disturb is enabled. Simply press the DND softkey to disable Do Not Disturb.
Here is a sample image. Your phone may look different depending on the model.
Disable via Star Code
Dial *79#. You should hear a confirmation recording stating Do Not Disturb De-activated.
Disable Via Web Interface
The following instructions will disable Call Forwarding via the web interface:
- Login to the Voicemail & Call Logs Portal. If you do not know the web address for the Voicemail & Call Logs Portal then login to the Support Portal and locate the address under the Voicemail & Call Logs section.
- You will be prompted to enter the extension number and voicemail passcode. Remember to enter the extension number for the phone with Do Not Disturb enabled. If you do not know the voicemail passcode then login to the Support Portal and locate or reset the voicemail passcode found under the Voicemail & Call Logs section.
- Click SUBMIT
- Click PHONE FEATURES from the left hand menu.

- You should be transported to the PHONE FEATURES page.
- Uncheck the box labeled DO NOT DISTURB under PHONE FEATURES as shown in the image below.

- Once all three Call Forwarding checkboxes are un-checked click UPDATE. Your changes will take effect immediately.